How to Create an Outlook Forward Rule
Note: These steps were written using Outlook 2003. Though most if not all versions should support this functionality, it may take slightly different steps in different versions.
These steps will describe how to forward an email that contains a specific Subject, e.g. “the subject,” from a specific email address, e.g. "foo@foo.com," to another Outlook user, e.g. "Outlook User."
1. Within Outlook go to Tools >> Rules and Alerts…
2. Click New Rule… This will start the Rules Wizard
3. Select the “Start from a blank rule” option
4. Select “Check messages when they arrive”
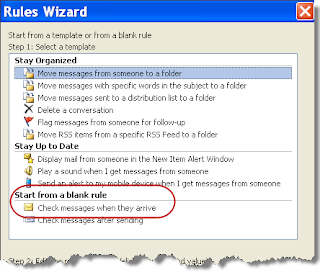 5. Click Next
6. Select the two check boxes “from people or distribution list” and “with specific words in the subject.” This puts both phrases in the lower “Step 2” text box.
7. Click on the “people or distribution list” text in the lower box. This will open a new Rule Address dialog box, similar to the standard Address Book dialog box. 8. In the From - > field (at the bottom of the dialog box) enter the email address "foo@foo.com" -- this is the address the email will come from. Note: ypu do not have to search for an address from your address book.
You can add multiple addresses manually, separating each with a semi-colon ( ; ). Likewise you can use the Address Book features and find email addresses to exclude.
9. Click OK. Notice how “people or distribution list” was replaced with "foo@foo.com".
10. Now, click on the “specific words” text in the lower box. This will open a new dialog box titled: Search Text.
11. Enter “the subject” in the first line and click Add. When you click Add, the text will be moved into the lower Search list box.
12. Click OK. Notice how the “specific words” text was replaced with “the subject.” 13. Click Next. Notice how the upper section of the Rules Wizard has changed.
14. Click the check box next to “forward it to people or distribution list.” This adds the phrase to the end of the text in the lower section of the Rules Wizard.
15. In the lower section, click on “people or distribution list.” This once again launches the Rule Address dialog box.
16. Find "Outlook User" in the list, and double-click on his name. This will add "Outlook User" to the “Specify whom to forward messages to:” (To - >) section of the dialog box.
17. Click OK. Notice how the “people or distribution list” text was replaced with “Outlook User.”
18. Click Next. The upper section changes once again, allowing you to add any exceptions to the rule just created.
19. Do not add any exceptions, click Next, again. Again the upper portion of the Rules Wizard has changed.
20. Go to the first text box, “Step 1: Specify a name for this rule” and give it a meaningful name, such as “Forward all foo foo emails to Outlook User.”
21. Check the check box next to “Run this rule now on messages already in the ‘Inbox’.” Once finished, this will immediately check for any emails in your inbox that match the defined criteria. 22. Click Finish.
This runs the new rule and returns us to the Rules and Alerts dialog box.
23. Click OK. This completes our rule definition.
Here is how you can disable this new rule.
1. Within Outlook go to Tools >> Rules and Alerts…
2. Uncheck the checkbox next to the Rule titled “Forward all foo foo emails to Outlook User.”
3. Click OK.
These steps will describe how to forward an email that contains a specific Subject, e.g. “the subject,” from a specific email address, e.g. "foo@foo.com," to another Outlook user, e.g. "Outlook User."
1. Within Outlook go to Tools >> Rules and Alerts…
2. Click New Rule… This will start the Rules Wizard
3. Select the “Start from a blank rule” option
4. Select “Check messages when they arrive”
 5. Click Next
6. Select the two check boxes “from people or distribution list” and “with specific words in the subject.” This puts both phrases in the lower “Step 2” text box.
7. Click on the “people or distribution list” text in the lower box. This will open a new Rule Address dialog box, similar to the standard Address Book dialog box.
 8. In the From - > field (at the bottom of the dialog box) enter the email address "foo@foo.com" -- this is the address the email will come from. Note: ypu do not have to search for an address from your address book.
You can add multiple addresses manually, separating each with a semi-colon ( ; ). Likewise you can use the Address Book features and find email addresses to exclude.
9. Click OK. Notice how “people or distribution list” was replaced with "foo@foo.com".
10. Now, click on the “specific words” text in the lower box. This will open a new dialog box titled: Search Text.
11. Enter “the subject” in the first line and click Add. When you click Add, the text will be moved into the lower Search list box.
12. Click OK. Notice how the “specific words” text was replaced with “the subject.”
 13. Click Next. Notice how the upper section of the Rules Wizard has changed.
14. Click the check box next to “forward it to people or distribution list.” This adds the phrase to the end of the text in the lower section of the Rules Wizard.
15. In the lower section, click on “people or distribution list.” This once again launches the Rule Address dialog box.
16. Find "Outlook User" in the list, and double-click on his name. This will add "Outlook User" to the “Specify whom to forward messages to:” (To - >) section of the dialog box.
17. Click OK. Notice how the “people or distribution list” text was replaced with “Outlook User.”
18. Click Next. The upper section changes once again, allowing you to add any exceptions to the rule just created.
19. Do not add any exceptions, click Next, again. Again the upper portion of the Rules Wizard has changed.
20. Go to the first text box, “Step 1: Specify a name for this rule” and give it a meaningful name, such as “Forward all foo foo emails to Outlook User.”
21. Check the check box next to “Run this rule now on messages already in the ‘Inbox’.” Once finished, this will immediately check for any emails in your inbox that match the defined criteria.
 22. Click Finish.
This runs the new rule and returns us to the Rules and Alerts dialog box.
23. Click OK. This completes our rule definition.
Here is how you can disable this new rule.
1. Within Outlook go to Tools >> Rules and Alerts…
2. Uncheck the checkbox next to the Rule titled “Forward all foo foo emails to Outlook User.”
3. Click OK.

Comments