Add a watermark to Office files, Word, Excel, and PowerPoint
Only Microsoft Word has a built-in watermark feature, but Excel and PowerPoint have a reasonable workaround to adding watermarks on those files, as well.
For each of the instructions, I'm using Office 2016 for Windows.
Word
Word is very easy -- just 3 quick steps.
- Go to the Design ribbon in your Word document.
- Click on the Watermark icon of text found near the right end of the ribbon in the Page Background section.
- Select a watermark you prefer or Custom Watermark... from the menu.
If you select the custom option, you have multiple options beyond just custom text. - Enter watermark text (or alternatively a picture).
- Change the font used.
- Change the font size or use auto for auto-scaling.
- Text color.
- A layout of diagonal or horizontal.
When you need to remove the watermark, repeat steps 1 and 2, and then select Remove Watermark found at the bottom of the menu.
Excel
The workaround for a watermark in Excel is done by using an image file.
- Find or create an image with the watermark of your choosing. Capturing a watermark from a blank Word doc is an easy solution to this.
- Go to the Insert ribbon in your open Excel spreadsheet.
- Click on the Header & Footer icon found near the right end of the ribbon in the Text section of the ribbon.
- If the Excel window isn't wide enough, the Header & Footer icon may be dropped from the ribbon due to space constraints. If this is the case, click on the Text icon to see all the text options including Header & Footer.
- You should now see your cursor flashing in the Header section of your Excel file. The ribbon should have changed to Header & Footer Tools | Design.
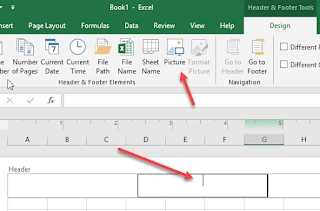
- Click the Picture icon found in the ribbon.
- Find the image file you created in step 1, and complete the insert file dialog.
- Click anywhere below the header to finish the process.

If you want to change the format of the picture, begin by repeating steps 2 and 3. Then click the Format Picture icon for options including Color, Brightness, and Contrast options, which are available on the Picture tab.
To remove the watermark picture file, follow these steps.
To remove the watermark picture file, follow these steps.
- Repeat steps 2 and 3 above to open the Header section of the spreadsheet.
- Delete the text "&[Picture]"
- Click anywhere below the header
PowerPoint
The workaround for a watermark in PowerPoint can be done with an image (preferably transparent) or with text. The steps below will describe how to use text for a watermark, but the steps are very similar when using an image for a watermark.
- Go to the View ribbon in your open PowerPoint presentation.
- Click on the Slide Master icon found in the Master Views section of the ribbon. Note that you're now on a new ribbon, Slide Master, which was inserted between File and Home.

- Follow these steps to add a watermark to all the slides of your presentation EXCEPT the Title slide.
- Go to the Insert ribbon.
- Select the WordArt icon found in the Text section of the ribbon.
- Select the font decoration of your choice from the dropdown menu.
This will insert a text box in the middle of your slide with the text "Your text here" using the font decoration you chose. Note you're now in a new ribbon, Drawing Tools | Format. - Replace "Your text here" with your watermark text, e.g. "DRAFT."
- You have many options to customize your watermark.
- Use the rotate handle to change the text rotation, e.g. diagonal.
- Move the text box to anywhere on the screen.
- Choose a different WordArt Style.
- Return to the Home Ribbon and change the font type and/or font size.
- When you're satisfied with your watermark, return to the Slide Master ribbon.
- Click the Close Master View icon found at the end of the ribbon. Your watermark will now be ONLY displayed when you use the Title slide in your presentation.
- If you ALSO want the watermark on your Title slide, complete these additional steps.
- Return the Slide Master by repeating steps 1 and 2 from above.
- Select and copy (CTRL-c) the watermark you previously created.
- In the slide navigator found to the left, click to the next slide, which should be your Title slide master.
- Type CTRL-p (paste) so the watermark lands in the exact spot it is on all other slides. (Of course, you can move the watermark text to anywhere on the screen if you wish.)
- Go to the Drawing Tools | Format ribbon if you wish to customize the watermark for just the Title slide.
- Return to the Slide Master ribbon and click the Close Master View icon once you've completed any customization.
- If you want the watermark ONLY on the title slide, follow the original steps 1, 2, and 3, but before step 3.1, in the slide navigator found to the left, click to the next slide, which should be your Title slide master.

Admittedly if you're not familiar with the Slide Master in PowerPoint, it can feel a bit stressful, but once you've done this, you realize you have opened up a lot more options for creating custom PowerPoint presentations.
Your watermark will stay with your PowerPoint if you change the presentation theme though PowerPoint will update the style to try and match the new theme. You likely will have to return to the Slide Master and modify the watermark, again.
Now you're an expert at watermarks in Word, Excel, and PowerPoint.
Now you're an expert at watermarks in Word, Excel, and PowerPoint.
Comments